Home » Home Improvement
Category Archives: Home Improvement
Mold Remediation – The Basics
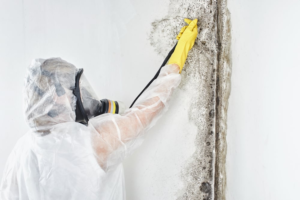
Mold Remediation involves cleaning and encapsulating wet and mold-damaged materials to prevent water damage, further deterioration of the affected structure, and odor control. Usually, a professional remediation company is hired to do this.
Professionals will isolate the affected area by sealing all windows and other openings. They will also cover the doorways to prevent mold spores from entering unaffected rooms. They will also mist the affected areas to suppress airborne spores.
Moisture Assessment
Mold spores thrive on moisture and can quickly grow into colonies that produce allergens and irritants, leading to health issues. The first step in any mold remediation process is to identify the presence of a problem, which can usually be done with a visual inspection and moisture testing. Once the moisture source has been identified, it must be corrected in order to prevent recurring problems.
Once the mold and moisture assessment has been completed, a remediation proposal will be written outlining the scope of work to be performed. At this point it is a good idea to get multiple quotes from different companies to ensure you are receiving the best possible price.
During this stage the professionals will begin the mold removal process by spraying an EPA approved biocide to all affected areas. This liquid will kill all mold spores and leave the area safe for occupants. Once the biocide has had a chance to work, the professionals will use HEPA-approved vacuums to clean all surfaces to remove any residual spores, debris and dirt from the area. After the surface cleaning, the professionals will apply a mold resistant coating encapsulating product to all surfaces to help prevent future recurrence of the problem.
In some cases, the contaminated materials such as carpeting, sheetrock, walls, and ceiling tiles may need to be removed and replaced. This can add significantly to the overall cost of a project. The professionals will try to avoid damaging as much of the structure as possible, and the remaining contaminated material will be stowed away in a sealed containment area for disposal.
The next step is to begin the drying process. This can take up to 48 hours and is typically done using fans and dehumidifiers. In some instances, the experts might also use ozone or other non-chemical biocides in place of traditional chemicals. Client health concerns and medical suggestions are always taken into consideration prior to the application of any microbial biocides.
During this phase, the professionals will also seal off the remediated area with plastic sheeting and duct tape. This way the occupants of the home can continue living their normal lives while the project is taking place.
Containment
Mold spores need to be contained in order to reduce the chance of cross-contamination in other parts of the home. A trained professional will set up containment barriers around the affected area in order to prevent mold spores from spreading to non-affected areas of the home. The mold remediation team will also set up negative air machines to remove any mold spores from the air in the contaminated space. This process is vital to the success of any mold remediation project.
Moisture in the home is not only a catalyst for mold growth but can also contribute to the growth of harmful bacteria such as E-coli and Salmonella. These bacteria can cause serious illness in humans and can also be spread to others by touching or breathing in infected surfaces. In addition, some types of molds produce a fungus that produces toxins or mycotoxins, which can also be harmful for people and pets.
If you’re a homeowner and believe that your home may be infested with black mold, it is important to hire a professional for a thorough mold inspection and testing before starting any work. A trained and certified mold remediation technician will evaluate the problem and recommend the necessary steps to take for the safe removal of the fungus.
Before any actual mold remediation is begun, it is critical that all the areas with visible signs of black mold be cleaned and sanitized in order to minimize any further growth. Depending on the severity of the problem, this can involve removing porous materials such as drywall and insulation. Generally, carpeting and drapes must be removed as well.
After the areas that are infested with black mold have been scrubbed clean and sanitized, a team of technicians will encapsulate the affected area to inhibit mold regrowth. They will also sanitize any non-affected areas to ensure that all the mold spores have been killed.
Before the mold remediation begins, the client will need to turn off any utilities to the contaminated room, as this can be dangerous. The client should also move any contents out of the contaminated room, including furniture and decor, as these items will only continue to release mold spores into the air.
Cleaning
Mold spores will grow on just about anything damp, but they thrive in areas that are dark and warm. That’s why it is important to clean up any surface mold and prevent its spread. Surface mold is easy to remove with a cleaning mixture of bleach and detergent. However, if it is a deep problem, a professional may need to apply an antifungal product. If you do it yourself, wear a mask and rubber or plastic gloves.
In the next step of the process, mold remediation specialists clean the infected area with industrial-grade cleaners. They also use a biocide, an EPA-approved substance that renders mold spores sterile. They then use HEPA-approved vacuums to clean all surfaces. They may use ozone, UV light, or steam treatment for difficult to reach places.
It is a good idea to leave this step to a mold remediation specialist, as these chemicals are very powerful. They can damage your home’s carpet, wood furniture, and drywall. They can also trigger serious health problems for you and your family.
After they are done with the cleaning, the specialists will fix any moisture and humidity issues that caused the mold problem in the first place. For example, if a bathroom fan duct is leaking, the technicians will repair it. They will then seal the area with plastic walls and duct tape. This way, the mold spores won’t be able to travel from one room to another.
Once the experts have finished, they will re-inspect the site to make sure that the mold has been fully removed. They will then test the air with a moisture meter. If they detect no traces of mold in the air, you can re-occupy the area. However, you should still check the air often for mold spores. If you notice any, increase the ventilation and clean more frequently.
Remediation
When mold spores are exposed to a biocide, they become sterile and cannot grow. This is what the experts call encapsulation. After the spores are killed, the professionals clean and sanitize the affected areas. This also includes sealing the area to prevent spores from spreading to other rooms or homes.
This is a critical step that can be difficult to do well. Professionals will use HEPA-approved vacuum cleaners to remove any lingering moisture residues and mold debris. They will also damp-wipe and dry surfaces to prepare them for a whitewash or paint to stop mold from growing again in the future.
Once the contaminated area is completely cleaned, the professionals will seal it off with plastic sheeting. They will also seal all windows and other openings to prevent the spread of airborne spores. This is a necessary step because mold spores spread quickly in moist conditions.
During the remediation process, it is important to follow EPA guidelines and other mold removal and cleaning standards. This includes using an antimicrobial solution, a negative pressure HEPA-filtered vacuum, and a dehumidifier to remove moisture from the home. Depending on the situation, experts may also recommend replacing carpet, drywall and other porous materials that are not salvageable.
Once the surface is clean and the spores are dead, the experts will let the area dry for several days to ensure that no moisture remains. They will often use fans or dehumidifiers to speed up this drying time. They will then re-inspect the area for any remaining mold or visible damage. They will also test the remediated area with an environmental testing company for final moisture, odor, and mold tests. This will confirm if the area is at a normal fungal ecology or Condition 1 level, meaning it is safe for occupants to return.
This is a very comprehensive process that can take one to five days. It is essential to get mold remediation done quickly because this can lead to serious health issues and structural damage in a home or business. Mold growth can also be a sign of more serious problems like water damage or sewage backups.
Understanding Paint Finishes – Matte Gloss And More
Once you’ve landed on your perfect paint color, you’ll also need to consider the finish. The sheen—or level of shine—can influence how the color looks and its durability.
Higher sheen levels are typically more resistant to stains and easier to clean, making them better for high-traffic areas. But what sheen is right for your space? House Painters Wilmington DE know the answer.

Matte
Typically, a matte finish is recommended for high-traffic areas like mudrooms because it doesn’t show scuff marks as easily. It also hides surface imperfections better than satin or gloss paint and is cheaper per gallon. Additionally, matte paint requires less prep work and touch-ups as it doesn’t need a primer and can be applied straight to the wall without a base coat.
A matte finish looks modern, sophisticated, and elegant. It’s an excellent choice for a contemporary home or commercial space with a minimalist design and neutral color palette. When used on walls, matte finishes can add a bold statement that contrasts against a rich wood trim or other glossy accents.
When it comes to printing, matte surfaces are perfect for portraits and fine art prints that are meant to be viewed up close. Their non-reflective surface reduces glare and allows for a sharp contrast, which helps to showcase the colors and details in the image. Additionally, matte paper is more durable than glossy, so it stands up well to smudges and fingerprints.
The matte finish also works exceptionally well for brochures, catalogs, and other printed materials that rely heavily on full-color images. This type of finish helps to protect the paper and makes it appear vibrant and appealing to customers. In fact, some upscale brands intentionally choose to print their catalogs on matte paper to convey their brand’s unique aesthetic and feel.
Satin is a paint finish that sits between the dull, non-shiny matte finish and the reflective surface of a glossy gloss. It has a low to moderate amount of sheen that reflects light, but not as much as a gloss or semi-gloss paint. The difference in sheen also allows satin to clean and resist moisture better than matte.
Unlike matte, satin does require a primer and will look best when used on properly primed walls. It also dries faster and covers better than matte so it’s ideal for novice painters or DIY projects. However, because satin requires more preparation than matte, it’s not as budget-friendly as matte paint.
While satin is more durable than matte, it is more sensitive to scratches and scuffs as opposed to matte which hides surface imperfections better. This can make satin a great choice for high-traffic areas in homes with kids or pets. It’s also a great choice for older exterior siding that has layers of old paint.
In terms of durability, satin is better than matte but not as good as glossy or semi-gloss. It’s easy to clean and has good moisture resistance, making it a great option for high-traffic areas in homes with children or pets. It’s also a good choice for kitchens, bathrooms, and other high-traffic areas that may be exposed to lots of moisture.
Satin
With the many different options for paint finishes, it can seem like a Rubik’s cube to choose which sheen is best. Fortunately, with a little research and consideration, you can find a finish that suits both your aesthetic and the intended use of the space.
Satin is a popular paint sheen for interior spaces as it offers a moderate amount of shine but also hides wall imperfections well. It’s ideal for areas that see moderate to high traffic, such as hallways and stairs or kitchens, where marks and scuffs are more likely to occur. While it may be harder to clean than gloss, satin is more stain-resistant than flat and will withstand moisture better than semi-gloss.
Unlike flat and eggshell, satin has the ability to reflect some light so it doesn’t have as much of a muted matte look. This makes it a good choice for surfaces that need to be cleaned frequently or will be exposed to direct sunlight as it won’t fade in the same way as flat paint. It’s also a great choice for furniture or upcycling projects, as it allows the pigment color of the paint to stand out rather than being hidden by a glossy surface.
A satin sheen is more resilient than a flat finish but not as durable as a semi-gloss. It holds up to mild scuffing and marking but won’t be able to resist as much water or moisture as semi-gloss. It can be easily buffed to remove minor marks or scratches with a soft cloth, but you’ll need to be gentle so the sheen isn’t compromised.
Gloss is the shiniest paint sheen, reflecting most of the available light and giving surfaces a bright and shiny appearance. It’s often used for trim pieces, such as window frames and shutters or doors, but it can also be used on walls if you are looking to create a sleek contemporary style. While it’s easier to clean than satin, it is also more susceptible to moisture and stains so you’ll need to be extra careful when cleaning and avoid abrasive cleaners or harsh chemicals.
It’s easy to get overwhelmed by the number of sheens available in your local DIY store, but knowing the difference between matt, gloss, and satin can help you make a more confident choice. By considering your aesthetic preferences, the maintenance requirements of your space, and your budget, you can choose the perfect sheen for your next painting project.
Semi-Gloss
For high-traffic areas where scuff marks and moisture are commonplace, semi-gloss is your best bet. This type of paint has a slight sheen and is more durable than satin, but not quite as shiny as gloss. It’s a good option for kitchens, bathrooms, children’s rooms, and other high-moisture areas. While it’s not as stain-resistant as matte or eggshell, a good quality semi-gloss should be able to hold up against most drips and stains and can be easily cleaned.
As with satin, it’s important to remember that the amount of sheen a paint has can have an impact on its color saturation. This means that, depending on the sheen level, a particular paint color may appear slightly darker in satin than it does in semi-gloss. Satin also tends to hide imperfections more readily than matte or flat finishes, while semi-gloss reveals a bit more in the way of flaws, particularly if it’s applied to a rough or uneven surface.
Like gloss, semi-gloss is manufactured with more binders than satin in order to offer its sheen and durability. As a result, it can cost more than other paint finishes. Luckily, its durability and ease of cleaning make it worth the added expense for some projects.
Another benefit of semi-gloss is that it’s a great choice for doors, trim, and cabinets, as well as other furniture pieces. The added sheen makes this type of paint a good fit for areas that see a lot of activity, such as family rooms or dining spaces. It’s also a good choice for high-traffic areas such as hallways and staircases.
The sheen of a semi-gloss paint also makes it easy to highlight imperfections in the wall or woodwork, so it’s important to prepare the surface carefully before you begin painting. It’s a good idea to use a sort-pile roller for rough or imperfect surfaces and a foam roller for smooth surfaces in order to achieve an even, consistent coat.
Ultimately, choosing the right type of paint comes down to personal preference and how the space will be used. Those looking for a timeless, sophisticated look will prefer satin or eggshell. Those with more active households will be happier with the durability and moisture-combating qualities of semi-gloss.
It’s also important to note that the finish you choose will have a big impact on how long your paint lasts. Generally speaking, higher sheen levels will wear down more quickly than flatter paints, so keep this in mind if you plan on repainting or redecorating your home frequently. If you are unsure which finish is best for your project, talk to a professional handyman. They can help you weigh the pros and cons of each type of paint and choose the right one for your unique needs.
The Benefits of Landscape Lighting
Outdoor Lighting Orlando is a great way to showcase your home’s exterior after dark. It can also add value to your property by making it more appealing to prospective buyers.
Using lights to light up trees, fountains, flower gardens, patios or pergolas can really draw the eye. Lighting can also highlight a pond or water feature.

Enhances Curb Appeal
One of the most immediate benefits of landscape lighting is that it elevates curb appeal. Well-placed landscape lighting highlights key features of your property, drawing attention to gardens, trees, and unique architectural details. This enables your home to stand out from the neighborhood at night, giving it a magical appeal that sets it apart.
Whether you have a particularly beautiful tree or a garden that you’re especially proud of, landscape lighting can show it off at night. You can also use landscape lighting to draw attention to an eye-catching structure or feature like a fountain, pond, or statue.
Another way to enhance curb appeal with landscape lighting is to use silhouetting. This technique uses a combination of brightly-lit areas and shadowy backdrops to create a dramatic interplay of light and dark. This can accentuate the subject of a lighting fixture while still providing a sense of mystery with details muted into shadow.
Landscape lighting can highlight important elements of your property that may have been overlooked in the daytime, such as decorative stonework or brickwork around entryways, window pediments, and other unique features. It can also illuminate a pond or water feature to showcase their hypnotic patterns and intricate details, or accent a statue or other decorative element with its own distinctive lighting effect.
When you’re looking to sell your home, you want to make sure it looks its best, especially at night. Adding landscape lighting to your home can help it stand out from the competition and give potential buyers a great first impression.
If you’re not planning to sell your house any time soon, you can enjoy the enhanced beauty of your property with landscape lighting for years to come. You can even switch out the bulbs in your fixtures to change the color temperature or beam spread, depending on what you’re trying to accomplish.
A house that is shrouded in darkness is not going to attract any potential buyers, and it’s not a welcoming sight for guests who visit your home. Fortunately, landscape lighting can solve both of these problems by illuminating your home and creating a comfortable, inviting atmosphere that’s perfect for entertaining.
Creates a Nighttime Oasis
You’ve invested a lot of time and effort into your landscape, whether it’s an architectural feature of your home, prized plant arrangements, beautiful flower beds, or an impressive water feature. Don’t let all of your hard work fade after sundown. Highlighting these features with landscape lighting allows you to enjoy them all night long.
Light is a transformative tool that can enhance even the most mundane objects and spaces. Landscape lighting can make your trees glow, spotlight your outdoor living space, and illuminate a walkway or driveway to provide safety for family and guests. You can also customize the way your home and landscape look with colored lights, such as red and green for the holidays or blue and violet for a resort-like ambiance.
In addition to adding warmth and a relaxing ambiance, landscape lighting can also help increase your property’s value. By highlighting the unique features of your landscape, you can showcase what makes your home special and distinguish it from others in the neighborhood. As a result, your landscape is more likely to sell when you are ready to move.
Whether your landscape is full of colorful flowers, tiki torches, or vibrant plants, it can become the perfect place to relax at the end of a long day. After a day of entertaining and exploring, your family and friends will love coming to your yard for drinks, dinner, or just some quiet time to unwind.
Enhances Safety
When thinking about landscape lighting, visions of illuminated trees and accentuated architectural features come to mind. These are beautiful touches that can be included in a well-designed landscape, but landscape lighting also enhances safety. After dark, tripping and falling hazards are just as prevalent on your property as they are during the day. From misjudging a step to slipping on an uneven paver, the potential for accidents is endless. Landscape lighting can help minimize these risks by illuminating pathways, steps, and stairs to make it easier to navigate your home after dark.
Similarly, your driveway and entryway can be lit to provide safer passage for guests at night. Whether you have children who like to explore or people coming for a party after dark, you can ensure that everyone has a clear path to your front door by adding lighting to these areas.
Brightly lit walkways, paths, and stairs also reduce the risk of injuries to family and friends who enjoy spending time on your property. Evening parties can lead to sore heads and strained muscles, so having lighting to guide your visitors will keep everyone safe and sound.
The same holds true for business properties. After-hours cleaners, repair crews, and employees may have to work in the dark and may not know where certain hazards lie on the property. Landscape lighting can improve the safety of these workers and other visitors by illuminating common tripping hazards, such as loose or uneven pavers or tree roots.
Having properly-placed landscape lighting can also deter burglars by making your home look occupied. This simple deterrent will make it more difficult for thieves to strike without being noticed, and your neighbors can report any suspicious activity to the police.
Before you can start designing your ideal landscape lighting system, you’ll need to determine how many lights you need and where they will go. You’ll also need to think about the type of lighting you want, which will impact the cost and installation process. Hardwired lights require a professional installer to dig trenches, and they’ll need access to an electrical source as well. It’s important to know that any obstacles they encounter during the installation process, such as concrete or tree roots, will add time and cost to the project.
Increases Value
There are few home improvements that can increase the value of a home as much as landscape lighting. It is one of the few that adds a significant amount of value while it is also a very low-cost investment. This makes it an ideal renovation to do before selling your home.
When potential buyers tour your property, they will notice the lighting and may be impressed by it. This can make your house stand out in the market and give you a higher chance of a quick sale with a high offer.
Landscape lighting can also increase the safety of your property by highlighting any obstacles or dark areas. This can help deter criminal activity and keep your family safer when going outside at night. It can also highlight features of your home such as a unique front door or a stunning tree in the yard, making it more appealing to buyers.
If you’re interested in sprucing up your outdoor space, contact Blooms Landcare to learn more about our landscape lighting options. We can highlight your beautiful architectural features and trees, creating a magical atmosphere that will set you apart from the rest of the neighborhood.
There is no exact number of how much landscape lighting increases the value of your home, as it depends on a variety of factors such as location, quality of the installation and the preferences of the buyer. However, there is no doubt that it can enhance your curb appeal and make your property look more valuable than others in the area.
With so many renovations available to homeowners, it can be difficult to decide what improvements are worth the money and which ones don’t add any real value to your home. Landscape lighting is a great way to show off your property, especially at night when most of the neighbors’ homes are dark. It can also enhance the safety of your family and visitors while promoting your home to potential buyers, making it an excellent addition to any renovation budget. We can help you choose the right options and install them correctly so they can last for years to come.
Ceiling Repair – Why It’s Important to Repair Your Ceilings
Ceiling Repairs Perth is a vital process that can breathe new life into your home or office. By addressing common issues like water damage, cracks, and outdated textures, this process helps to create a refreshed and captivating interior space.

It is crucial to address any type of ceiling issue as soon as possible. This is because the more time that passes by without a solution, the worse the problem will become.
Water damage to a ceiling isn’t just unsightly, it can also lead to structural issues and mold growth. If you have a leaky ceiling, it’s important to get it repaired immediately. Otherwise, it will likely only get worse and may cause other health problems for your family or tenants.
The first signs of a leaky ceiling include water stains, cracks, and bubbling paint. These are all clear indications that a leak is present and needs to be fixed immediately. It is important to identify the source of the leak and fix it, whether this is a roofing issue or from a pipe. It’s also a good idea to have a professional clean the affected area and remove any mold.
When a leak goes unnoticed for a long time, it can cause more damage to the wood, insulation, and ceiling materials. Often, these materials will need to be replaced. In addition to replacing these materials, it’s also a good idea to waterproof the attic and basebments. This will help to reduce water collection in the event of an extreme weather event or clogged gutters and soffits.
Besides stains, cracks, and bubbles, water damaged ceilings can also feel bumpy or sag where the water has collected. This is because the drywall and plaster has warped from prolonged exposure to water.
Another sign of water damage to a ceiling is when the paint starts to flake or peel. This is due to the excess moisture that gets trapped between the paint and wall. If this continues, it can cause the drywall to crumble and break down, leading to further water damage.
If the ceiling is stained, it’s a good idea to take a look at the ceiling structure behind the staining. It’s a good idea to wear a face mask and eye protection when examining the area. Look for a hole in the drywall and any areas where the surface feels bumpy or sagging. It’s also a good idea not to touch any areas that feel moist or have a strong odor.
Once the source of the leak has been identified, it’s a good idea to dry all of the affected areas. This includes the drywall, wood, insulation, and other building materials. It’s a good idea to use fans to speed up the drying process.
Drywall Cracks
If your drywall cracks are just hairline and do not grow, you may be able to get by with simply repainting or plastering the areas. But, it’s important to remember that drywall cracks are warning signals that point to underlying problems. Ignoring these issues will only cause them to worsen over time.
Drywall cracks are typically caused by structural damage or uneven foundation settlement. They can also be due to temperature changes or poorly taped drywall seams.
Cracks that run parallel to the floor, walls, or ceiling may indicate a problem with the roof trusses or joists in your home. Cracks that are accompanied by sagging are particularly concerning and need to be addressed immediately.
Another common cause of drywall cracks is water damage. Leaking pipes, leaking roofs, and clogged gutters can all lead to moisture saturation within the walls and ceiling. Over time, this can cause the drywall to swell and begin to separate from the wall frame.
In some cases, a crack in the drywall may also be due to the natural settling of a new house or additions to a property. However, if the cracks are large or accompanied by other signs of structural damage such as sagging or water damage, it’s always best to seek the help of an expert foundation repair contractor.
Drywall Cracks That Are Involved with a Leak
If you notice a crack that runs down the center of the room or along the floor, it’s likely that there is a leak in the ceiling framing. If this is the case, you will need to find the source of the leak and fix it.
When repairing a cracked drywall, it is important to use a good quality mud or drywall compound to ensure that the drywall will be strong and secure. You can also cover the area with a crown molding to conceal the crack. Crown molding is very affordable and a beautiful way to add some decoration to a room. If you want a more permanent solution, you can always choose to cut out the affected section of the drywall and replace it.
Mold
Mold is an ominous sight, and it’s even more dangerous when it spreads. Mold spores are all around us and can latch onto surfaces wherever there’s humidity and organic material to help them grow. It doesn’t take much for mold spores to settle in the warm, humid environment of your home, especially in areas like your ceilings that aren’t often touched or seen.
If you see a spot on your ceiling that looks like it may be mold growth, a professional will need to inspect the area. They’ll be able to check the source of the mold and determine the best course of action. This could include a mold abatement process and replacing the affected drywall. In severe cases, mold may require a complete ceiling replacement.
In many cases, mold growth on the ceiling is caused by undetected pipe leaks. Often, these leaks aren’t noticed until there’s a noticeable musty smell in the room or damage to nearby walls and floors. If you suspect a hidden pipe leak, have a professional inspection done as soon as possible to avoid significant water damage and the growth of mold.
This ceiling has significant mold growth and appears to be a mushroom type fungus. This is highly unlikely to be due to a simple water leak, since this type of fungus requires significant nutrients and typically only grows in highly saturated materials. If you think your ceiling may have a leak, use a moisture meter to see if the area registers as wet.
This ceiling has a widespread pattern of mold growth and appears to be a black spore form of mold. This is likely due to a combination of poor ventilation and attic insulation. When cold air from the attic blows over the uninsulated ceiling, it causes condensation which can lead to mold growth. You can try to address this problem by increasing the heat and ventilation in the room, but it’s likely the mold will return unless you replace the entire ceiling.
Structural Issues
Ceilings are vital to the structural integrity of a home or building. They act as a barrier against weather elements, help with insulation and contribute to soundproofing. Unfortunately, ceilings are often neglected until they begin to show signs of damage like cracks or sagging. While these issues are unsightly, they can also indicate underlying foundation or structural damage that should be addressed immediately.
Ceiling cracks can be caused by a number of factors, including natural house settlement, a lack of proper support when installing the drywall or moisture issues such as water leaks or condensation build-up. Left unaddressed, these issues can lead to more severe problems that can threaten the safety of a building’s occupants and require costly repairs.
While minor cracks and discoloration can be repaired by an experienced DIYer, it’s always best to consult a professional before tackling larger repairs or structural damage. Discolored or sagging areas on the ceiling may indicate the presence of mold and other health hazards, while large cracks or sagging can be an indication of a more serious problem such as foundation settling or other damage to the structure.
If you’re experiencing any of these problems, it’s essential to take action as soon as possible. Ignoring these issues can lead to costly repairs and other complications, so it’s important to act quickly and seek professional advice.
Before you begin your ceiling repair project, it’s a good idea to prepare the area by laying down a tarp or piece of plastic to catch any falling debris. It’s also a good idea to move any furniture from the area and to set up a ladder or scaffolding that can reach the damaged area.
Depending on the severity of the damage, you can use a ladder or scaffolding to complete your ceiling repair project. If the damage is only minor, you can simply apply joint compound or Spackle to the affected area. If the damage is more severe, you’ll need to replace the entire section of drywall and may have to reinforce the joists or floor ceiling beams to ensure the structural integrity of your building.
What You Need to Know About Laminate Flooring
Laminate floors offer various design options and are ideal for high-traffic areas. They’re water-resistant and come in a wide range of styles.

They’re easy to clean, and their moisture-resistant surface coating stops spills and dirt clinging to the floor. They’re also durable and affordable. However, they do lack the authenticity of natural wood floors.
Laminate is easy to clean and durable, but it does need some special care. It’s best to sweep or vacuum daily to remove grit and dirt, and dry mop your floors weekly. This will keep debris from grinding into the laminate’s surface and scratching it. Vacuuming or sweeping in the direction of your floor’s seams helps catch the debris that can get stuck in between the interlocking boards.
Regular sweeping or vacuuming also prevents mold and mildew on your floors. Mold and mildew occur when there is excessive moisture on your floors. The most common cause of excessive moisture is a leaky roof or poorly ventilated rooms.
Spills and stains on your laminate floors are easy to wipe up, but it’s important to avoid getting the surface too wet. Laminate is not waterproof, and if the laminate becomes too wet it can warp or damage the surface.
A mild vinegar solution is a great choice for cleaning and sanitizing your floors. Mix a solution of water and vinegar to a ratio of 3:1 and apply it to a cloth or mop. Use the solution on a small section of your floor at a time, and blot up the excess liquid with a clean towel.
You can also clean your laminate with a standard broom or a vacuum cleaner with a hard-floor setting. But it’s not a good idea to use a traditional vacuum with a rolling brush, because the brushes can scratch and pit the surface of your laminate flooring over time.
Never use abrasive cleaners on your laminate floors, as they will dull the protective layer and leave scratches behind. Also avoid steam cleaning your laminate, as hot wet steam being forced into those seams and crevices between the boards will work its way into the particle board and swell it, causing damage that can’t be repaired.
Keep in mind that laminate is not 100% waterproof, and it’s best to try to maintain indoor humidity levels at 35 to 65 percent. This will help prevent shrinkage and warping of your laminate, and it will also make the floors more comfortable to walk on.
Durable
Laminate is an affordable, durable floor covering that can be used in most homes. It is available in a wide range of colors, styles and finishes to complement your décor. It is also easy to install. Some of the most popular brands include Shaw Laminate, Pergo and Armstrong Laminate. These floors are water-resistant and have high abrasion resistance. In addition, they are GreenGuard certified. Many of the largest home centers sell these floors, and you can find them at a convenient store near you.
The durability of laminate flooring depends on the type and quality of the material used to make it. The most popular type of laminate is manufactured with a core layer made from HDF, which is recycled and renewable to help conserve forest resources. This type of laminate is ideal for kitchens, bathrooms and other areas that are exposed to moisture. However, it cannot tolerate direct exposure to water for extended periods of time like wood-based floor materials can.
In the past, laminate flooring looked like plastic, but thanks to advances in manufacturing, new technologies have allowed it to look more realistic and offer a wider selection of design options than ever before. In fact, some of these floors have a photographic image that is sandwiched between dense fiberboard and a clear-plastic protective wear layer. This makes them more scratch resistant than traditional hardwood floors, and they can be cleaned with a mop or vacuum cleaner without damaging the surface.
When choosing a laminate floor, consider your lifestyle and the amount of use it will receive. If you have children or pets, look for a floor that is more scratch-resistant. Also, choose a floor with a low gloss or distressed finish that will hide scratches and scuff marks. If you have a lot of sunlight, opt for a floor with a UV-resistant finish, which will protect the decorative paper layer from harmful ultraviolet rays that can fade the color over time.
Another thing to consider when choosing a laminate floor is its resale value. If you plan on selling your house soon, it is important to choose a floor that will add resale value and last a long time. Authentic hardwood floors can be refinished, renewed and repaired more easily than laminate floors.
Affordable
Laminate flooring is a popular choice for many homeowners due to its affordability. Compared to natural materials such as stone or hardwood, it can be up to half the cost. The affordability of laminate also doesn’t compromise its visual appeal or durability. It’s resistant to dents, scratches, and daily wear and tear, meaning you can save money on costly repairs or replacements in the long run.
Another advantage of laminate is that it requires minimal installation time and costs. It can be installed without removing existing materials, making it a budget-friendly option for those looking to get a quick renovation project underway. It can also be installed on a pre-prepared subfloor, which can save time and labor during the installation process.
While laminate is an affordable flooring material, it can lack the authenticity and warmth of real wood floors. This can be a deal breaker for some homeowners, especially those who are looking to achieve a more traditional or high-end aesthetic.
Additionally, the use of non-renewable resources in the manufacturing of laminate can be a concern for some homeowners. This can contribute to the depletion of natural resources and environmental pollution. However, there are sustainable options for laminate flooring that can be a more environmentally friendly choice.
Depending on the type of laminate used, the look can be very similar to natural materials like hardwood or stone. Choosing the right style can make your home feel more warm and inviting. Additionally, laminate is an affordable option for homeowners who are undergoing a remodel to improve the resale value of their home.
After installing your new laminate floor, it’s important to let it “cure” for at least 24 hours before walking on it. This allows the floor to settle, which will prevent it from becoming uneven. You should also avoid using spike heels or cleats on your new floor. Stick-on felt pads can help protect the surface against abrasions and dents. You can purchase these pads from most home improvement stores or online retailers.
Versatile
If you want the look of natural wood or stone floors but don’t have a lot of money to spend, laminate is a perfect option for you. It’s durable, tough, and easy to look after – ideal if you have children or pets! It’s also very versatile and comes in a range of colours, finishes, and thicknesses so you can choose the best one to suit your space.
Laminate floors are made from composite wood pressed together at high temperatures. Its core layer is treated to prevent moisture damage and it’s topped with a hardwearing layer that is designed to resist scratching, making it a great choice for busy homes.
While it’s not as waterproof as real wood, the surface layer of laminates is moisture resistant and can easily tolerate a mopping. However, it’s important to keep in mind that laminate is a floating floor, which means that the individual planks are not bonded to the subfloor. This can cause warping and swelling if the laminate is exposed to copious amounts of water for a long period of time.
In order to maintain the beauty of your laminate floors, you should sweep or vacuum regularly and use a microfiber cloth or spray mop for weekly cleaning. Avoid using vinegar or any other acidic cleaners, as these can damage the laminate if used in excess. Also, avoid placing heavy furniture on your laminate floor as this can cause scratches and damage the underlay.
Another important consideration is that, while laminate is a hard flooring material, it is not as sound-absorbent as real wood. This can create a hollow sound underfoot. If you’re concerned about this, we recommend putting down a cushioned underlay that will help to absorb the sound and vibrations of footfall.
It’s also a good idea to place rugs or mats inside and outside of your doorways to prevent dirt, rock, mud, grass, and other outdoor particles from being tracked into the home. You can also place a mat under your pet’s water bowl and use a nonslip mat or rug pad under high furniture pieces like tables.
When It’s Time For a Window Replacement
Ensure your Window Replacement Foxboro MA is square by measuring diagonally across the frame from corner to corner. Also, use a hammer and flat bar to remove the flashing, trim, and brick molding, which may be reused.

Open the weight pockets and remove the metal weights and cords; these can be recycled. Then, vacuum the rough opening and fill any voids with loose fiberglass insulation or low-expansion foam.
Windows account for about 25%-30% of the average home’s heat loss and energy usage. With escalating energy costs, window replacements are one of the best investments homeowners can make to reduce heating and cooling costs. Many window companies claim homeowners can recoup the cost of new energy-efficient windows in about seven years through savings on their energy bills. However, these claims are based on unrealistic assumptions and energy modeling, and are not necessarily indicative of real-life performance.
Energy efficient windows are made with insulated frames and low-emissivity glass to reduce the transfer of heat between indoors and outdoors. This helps to keep heat in during the winter and out during summer, saving energy by reducing the work your heating and air conditioning system must do to maintain a comfortable temperature.
When choosing new windows for your home, look for the Energy Star label and consider a variety of styles, sizes, shapes, colors and features to find the perfect fit for your design preferences and energy efficiency goals. Whether you’re installing in new construction or replacing existing windows, there are two types of replacement windows to choose from: full frame replacement windows and insert windows (also called pocket replacement windows). While both offer energy efficiency benefits, the type of window you install will impact how well it performs.
During window installation, professional installers ensure that the gap between the old and new windows is properly sealed and caulked to prevent drafts and energy leaks. They also check that the window fits correctly in its space and that it is level and plumb to prevent any unnecessary movement that could impact energy efficiency.
When replacing your windows, opt for double-pane or triple-pane windows that are insulated and have low-emissivity coatings. This will provide the greatest energy-efficiency and comfort. You can also save by installing windows that are ENERGY STAR qualified and stagger the project over several years to take advantage of a 30% tax credit, which is currently available through 2032.
While energy-efficient windows are a smart investment, homeowners would be wise to invest their money first in attic insulation and weatherstripping, which can achieve far more significant results than installing new windows. Plus, more heat enters and escapes through attic hatches, recessed light fixtures and fireplaces than through the windows, which make up only a small fraction of your total wall area.
Longevity
Windows are an important feature of your home, adding curb appeal and improving energy performance. However, like any home component, windows do not last forever. Eventually, they will wear out or break down, leading to air and water leaks, mold, wood rot and other issues. Watching for signs of deterioration can help you decide when it’s time to upgrade your windows.
The longevity of your replacement windows depends on a number of factors, including their material and proper installation. Poor installation can lead to a lack of insulation and other problems. In fact, it’s estimated that over 30 percent of a home’s heated and cooled air can leak out through inefficient windows.
Window frames also have a direct impact on the lifespan of your new windows. Vinyl windows, for example, can last decades when properly installed and maintained. They are also available in a variety of colors to match any home design. On the other hand, wood frames may need to be repainted and resealed regularly to prevent rusting and damage.
Composite frames are another option for those looking for a long-lasting frame. They are often made from a mix of materials, such as fiberglass and wood, making them both energy-efficient and durable. Fiberglass is particularly strong and can resist a range of temperatures. However, composite frames tend to be more expensive than vinyl and wood.
Another factor that impacts the lifespan of your windows is the climate in which you live. High humidity and extreme weather conditions can cause your windows to deteriorate more quickly than in areas with milder temperatures.
A final consideration is the age of your existing windows. If your windows are more than 20 years old, they may be in need of replacement. Older windows are more likely to develop leaks, which can result in water and mold damage as well as higher energy bills.
In addition, if your home is located in a historic district or if the existing windows are part of a landmark structure, you may need to get permission from the Landmarks Preservation Commission (LPC) before installing new replacement windows. In these cases, it is essential that you choose windows that are compatible with the original architectural style of your home.
Style
There is a vast array of window styles available today. These options, along with modern engineering and fabrication techniques, have greatly improved the durability and energy efficiency of windows. In fact, replacing old windows with new ones can almost always help homeowners improve the comfort of their homes while reducing heating and cooling costs.
Homeowners should consider replacement windows when their current windows are damaged or in poor condition. Especially in older homes, single-pane glass or poorly fitting frames and sashes can contribute to water leaks, humidity problems and insect infestations. In addition, cracked windowpanes and rotting frames, sills or sashes can compromise the overall integrity of a house.
In many cases, window replacement can be done without affecting the existing exterior trim or interior wall surfaces of a home. This is known as insert window replacement, also called frame-in-frame installation. This style of installation can be a great way to preserve the original style and architectural character of a house or to accommodate special design features such as arches, circles, hexagons or octagons.
Insert windows can be installed in place of existing window sashes, operating hardware and covers. However, if the existing frame, trim and siding are in poor condition, it may be necessary to use full-frame replacement, or “new construction” windows. These types of replacement windows require removal of the old sash, frame and trim and are best suited for brand-new construction or adding rooms to a new or existing home.
Some of the most common replacement windows are single hung, double hung or casement windows. These are easy to install and work well in most homes. Block frame windows are another option. These windows don’t have a nail fin or brick mold and fit directly into the existing window opening. They’re a good choice for vinyl or brick construction as they easily match the look of those materials.
Finally, there are specialty windows that can be custom-ordered to meet the needs of a particular home or to complement a specific style. These include bay and bow windows, garden windows, awning and casement windows. Some of these windows can take up to 12 weeks to be delivered after the order is placed, but most are in stock and can be installed relatively quickly.
Warranty
When looking for a window replacement company, be sure to ask plenty of questions about their products and warranties. Any reputable company should be more than happy to answer your questions in an honest and transparent manner. If a company does not seem to have the answers you need, it may be time to look elsewhere.
A good window warranty should cover each component of the windows. This includes the frame, glass, and hardware. It should also include installation and labor. It should also be transferable if you decide to sell your home. If your window upgrades add value to your home, this feature could be especially valuable.
Different companies have different warranties. You should look for a manufacturer-backed, limited lifetime warranty or double lifetime warranty. These types of warranties typically offer the most robust coverage. They often include a transferable warranty that can be transferred to the next homeowner. However, these warranties usually have stipulations, such as only covering a fraction of the cost for non-original owners.
You should also look for a warranty that covers the glass and hardware. This is particularly important for energy-efficient windows that use inert gases to keep air in and heat out. These gases deplete over time, so a warranty that covers this is important. A reputable window company should be able to tell you how quickly these gases are expected to deplete.
Some companies may also offer their own workmanship warranty in addition to the manufacturers’ warranty. This can provide extra peace of mind that you’re working with a reputable and knowledgeable window company. This is especially true if the installer has any extra credentials from the manufacturer, such as being a master or elite installer.
In addition to looking at the length of the warranty, you should also read through the terms and conditions carefully. It is important to understand what a “lifetime” warranty actually means. Some manufacturers will only guarantee the quality of certain parts for a specified period of time, while others will include normal wear-and-tear in the definition of lifetime.